AWS SageMaker Pipeline - Part 2: Create the Steps and Create the Pipeline
- Arash Heidarian
- Oct 24, 2024
- 10 min read
Updated: Dec 12, 2024

Table Of Content:
SageMaker Pipeline?
What is it?
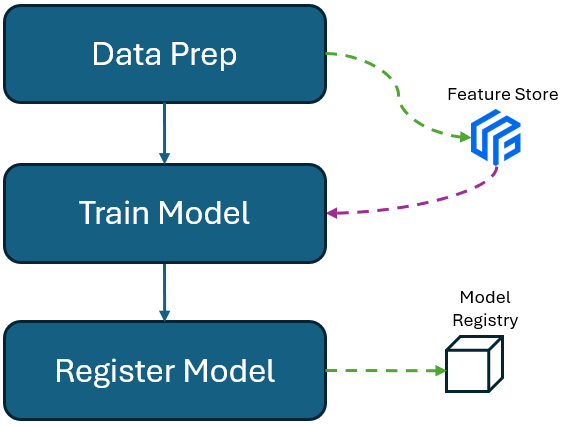
SageMaker Pipeline is a fully managed service in AWS SageMaker that enables you to automate, manage, and scale machine learning workflows. It allows you to create end-to-end pipelines for tasks such as data preprocessing, feature engineering, model training, evaluation, and deployment. By defining these steps in a pipeline, you can streamline the entire ML lifecycle, ensuring reproducibility, version control, and faster iterations. SageMaker Pipelines also integrates with other AWS services like Feature Store and Model Registry, making it easier to manage and deploy models efficiently in production environments. In my previous post, I explained how to build Feature Store and Model Registry groups. In this post we are going to use them to orchestrate a most typical data science workflow: Prepare the data and put it in Feature Store, train a model, register the model in Model Registry.
Building Blocks: Step
In SageMaker Pipelines, a Step represents a single task or operation within the larger machine learning workflow. Steps (referred as components in Azure and GCP) are the building blocks of the pipeline and can include activities like data processing, model training, model evaluation, or deployment. Each step performs a specific function and can pass data to subsequent steps, creating a connected sequence of operations.
Each step executes the given python script. The only input and output it deals with are artifacts located in S3, and it executes the process, on a EC2 instance (elastic VM on AWS), using a pre-built or custom docker image. Understanding what these term mean, how they work and how they need to be configured, is the key to build a proper pipeline. Lets briefly discuss these parameters associated to steps.
Processor Types
There are few processor types we can choose from, but here I only explain basic ones, which are easy to work with:
ScriptProcessor: My favorite one! AWS advises to use ScriptProcessor for running custom Python or shell scripts as part of a data processing job. It’s ideal for tasks like preprocessing, feature engineering, or other custom operations that can’t be handled by built-in functions. It literally can be used to execute any process, but it requires bit of smarter hardware selection and resource management.
SKlearn Processor: My second favorite processor! Similar to ScriptProcessor, but with a framework-specific environment (e.g., Scikit-learn, Spark). It runs scripts in specific frameworks like Scikit-learn, Spark, etc., for data preprocessing or transformation.
Estimator: The Estimator class is used for running custom training scripts. You can define your own training logic in Python (e.g., using TensorFlow, PyTorch, Scikit-learn, etc.), and SageMaker will run it in a training job. The script is executed in a training job, and you can use built-in frameworks (e.g., TensorFlow, PyTorch) or custom Docker images. SageMaker pulls your custom Docker container from a container registry (e.g., ECR), runs your training script inside the container, and manages the infrastructure.
HyperparameterTurnter: The TuningStep allows you to run hyperparameter optimization on your model training script. This step launches multiple training jobs with varying hyperparameters and finds the best-performing model. Tuning hyperparameters for optimal model performance. The script is executed in multiple training jobs, each with different hyperparameters.
Docker Containers' Image
When you create a processing job or a training job, SageMaker uses Docker containers to execute the specified scripts. This ensures that the environment is consistent and eliminates "it works on my machine" issues. SageMaker supports both built-in containers (preconfigured for common frameworks) and custom containers that you can define. Amazon ECR is a fully managed Docker container registry that allows you to store, manage, and deploy Docker images. It simplifies the workflow of using Docker containers in your applications by providing a secure and scalable repository for your images.
Instance Type
In s simple language, its a machine size/compute power to execute the process. In nutshell, instance types refer to various configurations of CPU, memory, storage, and networking capacity that define the characteristics and performance of Amazon EC2 (Elastic Compute Cloud) instances. When using AWS services like SageMaker Pipelines, different instance types can be selected for various steps (such as training, processing, and inference) based on the workload requirements. Each instance type can indeed be thought of as a virtual machine (VM) with specific hardware configurations tailored to different types of workloads. One of the key advantages of using instance types in AWS is the ability to scale up or down based on demand. You can easily switch to a different instance type as your workload changes, which is a significant benefit over physical hardware.
Role
In AWS SageMaker Pipelines, each step typically requires specific permissions to access resources and perform actions. These permissions are managed through AWS Identity and Access Management (IAM) roles. Each step in a SageMaker Pipeline can be associated with an IAM role that defines what the step is allowed to do.
Pipeline Architecture
Lets think of a typical data science pipeline: Data Preparation and Model Training. To build such a basic pipeline, we can take two approaches:
Direct exchange of artifacts between steps: When you look for tutorials for building pipelines in AWS, GCP or Azure, usually, if not always, you find pipelines, where Steps (components) pass artifacts (like pickle files or CSV files, variables) to each other. As each step runs in a an isolated container, it means there is no direct way of passing artifacts from one step to another. Hence cloud services suggest to use cloud storages, as a intermediate storage, to store and fetch the artifacts. That's how steps in fact pass things to each other. This approach means, execution of Step 2, depends on the output coming directly out of Step 1. Hence, in each step, you should define input and output, in such a way that input of Step 2, is coming from the output of Step 1 (its usually S3 uri path exchanged, nothing super fancy). In this blog post, we use this approach to pass trained model's path to next step which is model registry.
Indirect exchange of artifacts between steps: The other way of executing steps in a right order, is to simply define e.g. execution of Step 2 only depends on successful execution of Step 1. In this case, for our simple Data Prep and Model Training pipeline, Step 1 prepares the data and stores the data in a give Feature Group in feature store. Once all goes well and accomplished, Step 2 kicks-off, and it fetches data form the same Feature Group in Feature Store. In this scenario, we do not set any input and output parameters, and dependencies. But we just set a Feature Group name variable like feature_group_name="my-feature-group", and pass it as argument to both processes. This is actually what we are doing in this blog post.
Initial Setups
Importing Libraries
Lets import all necessary libraries first
Set Input and Output Variables
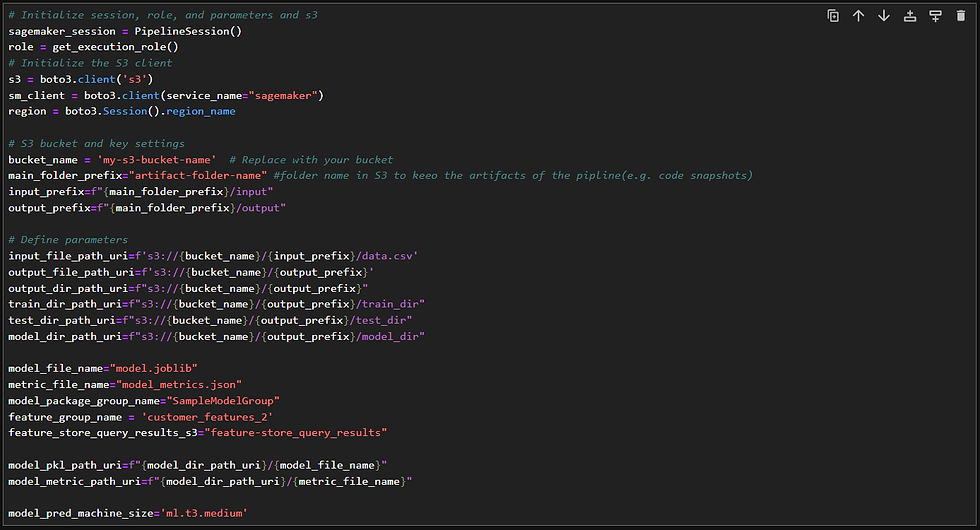
Then we can start to identify variables, which are mainly related to input and output of steps. As we mentioned, the input and outputs are all stored and fetched in S3. So lets just define the paths:
Fetching & Setting Feature Group Details Variables
Now lets extract details about the Feature Group in Feature Store, which our prepared data supposed to be stored in (see this post about how to create Feature Group in AWS).
Make Sure the Connection to Feature Store is working by getting a record from Offline Feature Store:
Data preparation and registry into Feature Store
Lets start with the very first step in our pipeline.
Define Data Prep Process
Now its time to write our script, to fetch data from our desired data source, and then apply some data transformation and preparation. To keep everything simple and brief, we simply build a dummy dataFrame, and then ingest it into the Feature Group we defined earlier. We write this process in featurestore_df_ingestion.py
Create Date Prep Step
Now its time to create the step, following structure illustrated in Image 2. All the parameters defined in the code below explained in details in Building Blocks: Step section above. To keep everything simple we use ScriptProcessor (different type of processor explained in processor types section above) and also using AW SageMaker built-in image (obviously you can define your own image for customized docker container).
Model Training
Create Feature Store data fetch function
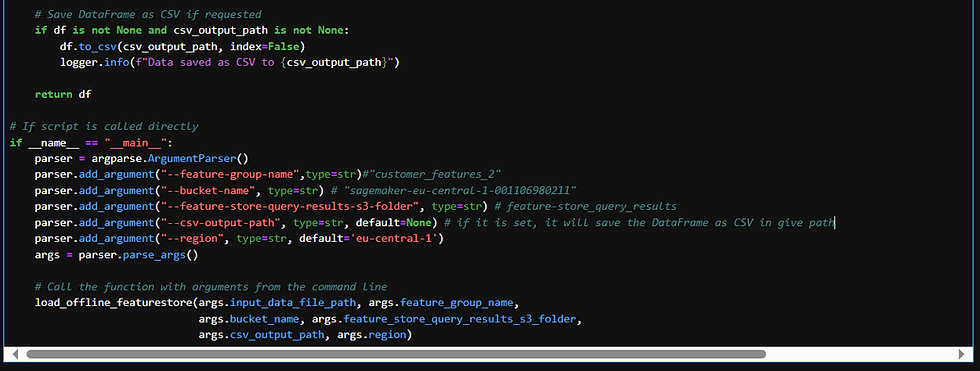
Here is the script to fetch data from feature store. Feel free to change it as you like, it is just a very simple data fetch function. Lets write the function into fetch_data.py
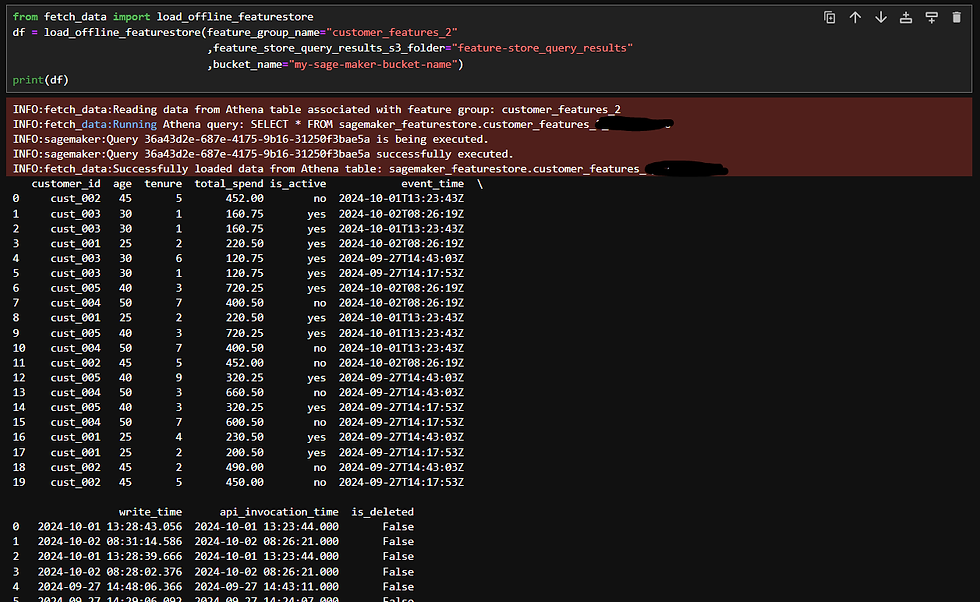
Testing the function to make sure we can fetch data from feature store:
Define Model Training Process
The next step is to create a typical model training script in train.py. The only new aspect here is that we’ll be retrieving data directly from the Feature Store using the feature group name and the data fetch function we defined in fetch_data.py. This allows us to access the up-to-date data in the Feature Store, which should have been updated in the previous step, ensuring that the training data is current.
In this step, we also define a metrics dictionary and save it to S3. This dictionary contains valuable information about the model's accuracy and other performance metrics. These details will be recorded in the Model Registry, allowing us to track and compare different versions of registered models.
It's important to note that AWS requires these metric files to follow a very specific format. If the format doesn't match AWS's requirements, the metrics may not appear correctly in the Model Registry. Make sure to check AWS’s recommended format for regression, classification, or any other type of model to avoid issues during the Model Registry step.
Create Model Training Step
Now its time to create the step, following structure illustrated in Image 2. All the parameters defined in the code below explained in details in Building Blocks: Step section above.
I put two code blocks to define two options in defining training step using two different processors (see different type of processor explained in processor types section) . Option 1 is using basic ScriptProcessor and Option 2 is using SKLearn Estimator. AWS suggests Option 2, as this estimator is optimising model training. Feel free to choose any of them. Be mindful that for model training you need a bigger machine (instance type) if you are dealing with big data:
Option 1: Using ScriptProcessor
In the code block below, in this line:
In the code above, lets dive into few important points. In line below where we use PrcoessingInput
model_inputs = [ProcessingInput(source='scripts', destination="/opt/ml/processing/input")]Here we move the fetch_data.py from our local, to the docket container. The "source" is path to "script" folder in your local path where we saved fetch_data.py, and "destination" is pointing to the path in the docket container. It simply copies the script from local to the docker. '/opt/ml/processing/input' is reserved path for containers in sageMaker. This is where we will copy scripts/helper functions.
Lets look at model_output:
model_outputs [ProcessingOutput(source="/opt/ml/processing/output",output_name="output_model",
destination=model_dir_path_uri)]
In PrcoessingOutput, "source" is pointing to pa reserved path in the AWS Docker container we use for this step. "destination" is pointing S3 uri path. So what we do here is to move generated model pickle file to S3.
Option 2: Using SKLearn Estimator
There are few restrictions and rules in how to pass inputs, scripts and generate outputs, when using SKLearn estimator. I have let some comments in the code. However, I do not use it, and I use Option 1 for this blog post.
Model Registry
In the previous step, we trained a model and saved it to S3 in a pickle format. Now, we will use the exact same S3 path to retrieve the pickle file and its performance dictionary file, register it in the dedicated model group within the Model Registry (see this post on how to create a Model Group in AWS). One key advantage is that we don't need to worry about versioning, as AWS automatically handles versioning once the model is registered in the Model Registry. Therefore, avoid including any version numbers in the model's pickle file name.
While I would prefer to register the model immediately after training in the previous step, AWS Model Registry requires the model to be referenced by its file path. So, registration must be done separately, using the S3 path to the model file.
Define Model Registry Process
Lets write the model registering script in register_model.py
Create Model Registry Step
Same as last two steps, we need to create the step ( see the structure illustrated in Image 2. All the parameters defined in the code below explained in details in Building Blocks: Step section above).
Create the Pipeline
Finally its time to orchestrate the steps we created, in a pipeline.
Now if you navigate to Pipelines menu, from left pane in SageMaker Studio, you see the list of Pipelines you have created:
Trace the Pipeline
Pipeline Execution
Lets click on the one we created using this post, which is abalone-pipeline. We should be able to see the entire history of pipeline execution, each covers all details of the pipeline, including the logs, code snapshot and all metadata:
Now lets drill down to the latest execution (first from the top):
Now we can see all the steps we created. If you click on each step, you will see all the details related to that step. The snapshot of the code, parameters, logs, associated resources, all can be found by clicking on the steps.
Feature Store
Lets navigate to Feature Store menu and see the result of Data Prep step, where we prepared and ingested prepared data. Our Feature Store Group is customer_feature_2, this is where our ingested data resides:
Model Registry
Finally, lets go to Model Registry, and see the final updates, as a result of our Pipeline execution. Navigate to Model menu, you will see the Model Group where our models are stored:
If we click on our group, we can see the entire history and versions of the model:
Summary
In this blog post, we explored how to create an end-to-end machine learning pipeline using AWS SageMaker Pipelines. We demonstrated how to ingest and store preprocessed data in the Feature Store, train a machine learning model using that data, and register the trained model in the Model Registry for version control and deployment. By leveraging AWS services like SageMaker Pipelines, Feature Store, and Model Registry, you can automate and streamline the entire machine learning workflow, ensuring efficient, scalable, and reproducible model development and deployment in production environments.
From The Inside
What makes us superior to them is our emotional depth
"Yellow leaves, remind you once again. The fall has arrived again. But you are not mine, anymore. Days are getting colder, sunsets are growing bolder, and the entire world whispers: you are not mine anymore..."
12+0=12


Comments